A starter pack on dynamic blogging with fastpages and heroku app deployment
Quick and easy tutorial on dynamic blogging with altair and plotly charts using fastpages and deployment of streamlit apps on heroku


After being introduced to blogging by Dr. Rahul Dave while doing a course with univ.ai, I have come to see that it is a great pathway to communicate with the world. Keeping this in mind I wondered if there was a way I could help in getting people started with their own blog. So here goes my attempt at precisely that.
While going through resources to get my dynamic jupyter notebooks up and running on fastpages, I noticed that there wasn't any compiled starter pack on blogging with fastpages using plotly and altair charts. I also found that deploying apps on Heroku using Streamlit provided a nice visual and engaging interface to go with my blog. So I thought why not have a nice and easy tutorial combining both. Hope you enjoy it!
In case you're not quite convinced as to why you would have to blog, here's a post by Rachel Thomas co-founder of fast.ai, that might change your mind.
So lets get started
Fastpages, unlike github pages, allows you to dynamically run code written on Jupyter Notebooks. We can set a period of time after which the blog automatically runs and updates itself. So if you were to blog about Covid-19 for example, this is a nifty tool that keeps your page upto date with the current data.
Setup
In order to set up fastpages on your github follow the steps shown in this video, or follow the instructions given here. You can change the content of homepage and description in config.yml and index.html within your fastpages repository. If you'd like to edit the about part of your page, move into _pages folder and edit about.md.
You could create both markdown blogs or jupyter notebook blogs and upload it into _posts or _notebooks respectively. Make sure you rename the files to the right format given in the README within each of these folders.
Once you are done with this, move to the _action_files in your fastpages repository and add run_notebooks.sh given here.
In this file you will see the following:
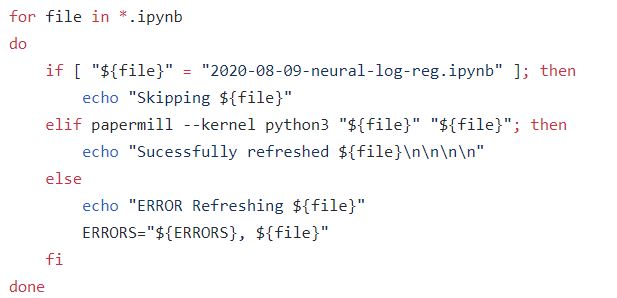
Here, if you do not want to periodically run a notebook, you can skip the file as I have with '2020-08-09-neural-log-reg.ipynb'. Remember to re-run your notebook before uploading in this case or the outputs will not be visible as the notebook will not be run after upload onto github.
Note: If your notebook is larger than 25MB, clear all outputs, upload it and have it run dynamically once after upload, after which you can add this file to be skipped for the next run.
Now, we need to add a workflow that runs an update. We can do this by adding update-nb.yaml found here into .github/workflows folder within your fastpages repository.
In this file you will see the following:
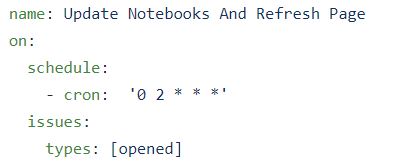
-cron: "* * * * *" gives the period of time after which the notebooks will be run and your page will get updated. You can play around with this to find something suitable for you. I would suggest a minimum period of 10 mins.
Note: If you get an error saying "./_action_files/run_notebooks.sh: /bin/sh^M: bad interpreter: No such file or directory"
Open the run_notebooks.sh with vi or vim and enter in vi command mode (key Esc), then type this
:set fileformat=unix
and save it with
:wq!
Upload the file back onto the repository and you're good to go.
Errors can be checked by going to action files within your repository and opening 'Update Notebooks and Refresh Page'
Creating notebooks that run plotly/altair/matplotlib on fastpages
Plotly and altair charts provide interactive charts that decorates your graphs and adds more appeal to it. I would suggest giving it a try in case you haven't already. Here is a blog created using plotly and altair charts. You can find the jupyter notebook by viewing on github or clicking this link.
Once you have completed your notebook that has plotly/altair and matplotlib charts, add a cell at the top that enables jupyter widgets and installs the required packages. Copy paste the below code to do the same.
%%capture
'''install the necessary packages'''
!pip install notebook ipywidgets
!pip install altair-viewer

'''Jupyter widgets extension'''

!jupyter labextension install @jupyter-widgets/jupyterlab-manager --no-build

'''jupyterlab renderer support'''

!jupyter labextension install jupyterlab-plotly@4.9.0 --no-build

'''FigureWidget support'''

!jupyter labextension install plotlywidget --no-build

'''Build extensions (must be done to activate extensions since --no-build is used above)'''

!jupyter lab build
You will need to import HTML using:
from IPython.display import HTML
In order to display your plotly chart, run
display(HTML(fig.to_html(include_plotlyjs='cdn')));
Matplotlib figures and other charts can be converted to plotly charts by using:
fig = go.Figure(fig); #fig : figure to be converted
Fastpages allows altair charts to render directly.
Link for the implementation.
Create a requirements.txt file. To do this, create a , .py file with all the imports you have used in the notebook and then run pipreqs on your command line (anaconda prompt/ubuntu) within the folder you have created the .py file in. This will create a requirements.txt file.
You now have a notebook and a requirements file that needs to be uploaded into your repository into _notebooks.
Note: Add new library requirements onto the same file when you create new notebooks keeping in mind that you do not have two of the same libraries in the file. This will likely cause a dependency conflict error.
Hurrah!! You now have a blog post!
Streamlit is great tool that provides a framework with simple code lines to create a dashboard or app. It runs dynamically again and can be hosted on Heroku, allowing anyone to access the app.
Follow the tutorial on this website to create an app on streamlit.
In order to deploy the app, you would need to create an account on Heroku. If you have a student account on github, it gives one free hobby dyno for up to two years. Otherwise a normal free unverified account will serve our purpose.
Follow the tutorial here to deploy the app on Heroku.
Note: Before running git push heroku master you will need to run the following:
git init
git add .
git commit -m "message"
Deploying the app on a custom domain name will require you to verify your account (giving credit card details) on Heroku. It will remain to be a free account, unless you purchase dyno hours.